Monday, December 18, 2017

Recipe for a Simple, Moist Chocolate Cake

I am putting up this recipe for a friend, who wanted one ages ago, but I was not able to send her one. Here you go Supti :)

Ingredients:

i. 1 cup flour
ii. 1/4 cup cocoa powder
iii. 1 1/4 tsp baking powder
iv. 1/4 cup butter
v. 3/4 cup caster sugar
vi. 1/4 cup water
vii. 2 eggs (for an eggless version just use 1/2 cup of condensed milk instead)
viii. 1/2 tsp vanilla essence
ix. A pinch of salt


Method:

i. In a mixing bowl, mix the dry ingredients together. In order to do that, sift together the maida, cocoa powder, baking powder and salt, and give them a whisk so that the dry ingredients  get mixed thoroughly.
ii. Next, it’s time to mix the wet ingredients together. In a large mixing bowl, add the butter, sugar, eggs (or condensed milk), vanilla essence and water, and whisk them together, till the mixture is smooth.
iii. Now, gradually mix the dry mixture to the wet one, a little at a time. Just fold in the dry mixture to the wet mixture. Do not over mix.
iv. Pour the mixture to a greased baking tin and bake at 180°C for 25-30 minutes or until a toothpick comes out clean.
v. Last but not the least decorate as you wish to. I used Cadbury Gems. :)


Tips for Beginners:


i. Please make sure that all your ingredients are at room temperature before you start with the prep for baking.
ii. The oven should be pre-heated to 180°C before placing the cake for baking, in the baking mode, i.e., both upper and lower heating elements should be on. And baking tin is placed on the lowermost rack.
iii. Do not open the oven door in between or when the cake has started rising, this might affect the cake to not rise.
iv. You can modify this recipe slightly to get a simple vanilla cake instead of a chocolate one. To do so, just use 1/4th cup maida instead of the cocoa powder. Also, reduce the quantity of water by half.
v. The cup measurements that I used were done using the below set, that I purchased from Amazon (click on the below link to view). However, using any cup handy with you and sticking to it for measuring all ingredients will work just fine.
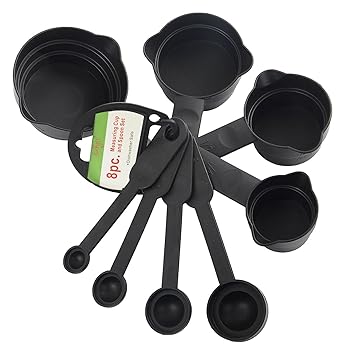


The final product looks like this:


Wednesday, May 3, 2017

My new OTG and a simple sugar cookie recipe

My New OTG:


In my last post, I had mentioned that I would be telling you about my OTG model in the next post. So, here it is. I got an Usha OTG 3635RC 35L Oven Toaster Grill (Wine & Matte Black). Image as below:

(This image has been sourced from Google)

I really liked the size and look of this OTG. And after using, I am very satisfied with its performance as well. I bought this OTG from a Spencer's retail outlet and it cost me 8999 INR. However, you can look up various online options, where you can probably get it for an even lesser cost.

PFB details about the OTG:

i. The accessories that you get with this OTG are - Skewers , Rotisserie, Baking Tray, Wire Rack, Crumb Tray, Rotisserie Tongs, Grill & Bake Tray Tong.

ii. The oven comes with 5 cooking modes,
    a. Toast/ Fry - Both top and bottom heating elements along with convection fan are ON.
    b. Grill/ Broil with Convection - Only the top heating element along with the convection fan is ON.
    c. Bake - Both top and bottom heating elements are ON.
    d. Rotisserie - Only the top heating element and the rotisserie motor are ON.
    e. Roast - Both top and bottom heating elements, convection fan and rotisserie motor are ON.

iii. The three knobs in the picture are controls for temperature, cooking mode and time.

That's about it. Now, baking, unlike cooking, requires you to be very specific about the measurements - be it ingredient or temperature or time. Therefore, please keep that in mind. Even more importantly, use your common sense. Please DO NOT blindly follow steps given in the recipe book. Think about it and do what your common sense urges you on. Of course, trial and error is the only fool-proof way of getting to perfection.

Simple Sugar Cookie Recipe:

This recipe is so simple and yet so yum, that they are going vanish from your plates faster than you can say cookies!

Ingredients:

i. 2 3/4 cups Maida 
ii. 1 teaspoon baking soda 
iii. 1/2 teaspoon baking powder
iv. 1 cup ghee
v. 1 1/2 cups powdered white sugar 
vi. 1 egg
vii. 3 tablespoonful of dried coconut powder (optional)
viii. 3 teaspoonful of Fennel seeds or saunf
ix. Crushed cardamom seeds from 15-20 pods of cardamom/ elaichi

Method:

i. Preheat the oven to 180℃ (for my oven the preheat time was 15 minutes)
ii. In a mixing bowl, beat together the ghee and sugar. Add the egg and the flavouring ingredients (coconut powder, fennel seeds and cardamom) and mix well.
iii. Gradually add in the dry ingredients, a little at a time and mix using a balloon whisk. This will form a very soft dough.
iv. Next, line your baking tray with parchment paper and apply little oil on your hands so that the dough does not stick.
v. Take a teaspoonful of the dough in your palm, roll it into a ball and place it on the lined baking tray. Repeat the process.
vi. Please remember to keep atleast 1.5 - 2 inches gap between the balls on the tray. This is because the cookie will flatten during cooking and we don't want them to stick together.
vii. Bake these cookies for 8-10 minutes. Once done, keep them in the oven for another 2 minutes and then you can take them out to put on a cooling rack.

Tips for Beginners:

i. The baking tray was placed on the lowest rack of the oven.
ii. I used the 'Bake' mode for the first 5 minutes of baking and then switched the knob to the 'Grill/Broil' mode for the rest of the cooking time. This avoided over-browning of cookies at the bottom while giving it a nice light brown colour to the crust.
iii. I modified the ingredients giving it an Indian touch. You can always use butter instead of ghee and vanilla instead of coconut, fennel and cardamom.

This is what the finished product looked like 😊


Do let me know if you liked this!

In my next post - Read about my first attempt at baking a plain vanilla sponge cake.

Till then, Happy Baking!

Wednesday, February 22, 2017

My thoughts as a wannabe baker

I have always loved the idea of baking. And when I finally decided to take it up seriously, I found an acute dearth of knowledge. I had to fumble all over the internet to find some actually useful information for beginners like me. Therefore, I decided to blog my findings down so that they would be able to help beginners out. Hope you find this information useful!

The first thing that you need as a baker is an oven. Now, I have baked cakes in a pressure cooker and they turned out pretty good.


And although this chocolate cake doesn't look much (due to the obvious lack of a suitably shaped baking tray), trust me, it tasted heavenly (and I'm not bragging)!

But this time, I wanted to try my hands on other types of baked goods including cookies, bread, muffins and even savoury dishes. Therefore, I decided to buy an oven. And saying this was clearly easier than actually deciding on which oven to buy. There's a saying "Too many choices can overwhelm us and cause us to not choose at all." The same almost held true in my case. I felt spoilt for choices, but I persevered and finally bought one. I'll tell you which one, but gradually.

The first choice was whether to buy a convection microwave oven or an OTG (Oven Toaster and Griller). I did a bit of research, all of which said there is apparently no difference in taste or texture between goods baked in a convection microwave oven versus those baked in an OTG. However, cooking in an OTG is considered a natural way of cooking as opposed to that in a microwave oven. Also, long term cooking in a microwave oven is not considered healthy. You can go through the link 'Why microwave oven cooking is harming your health' in order to understand better. Of course, there are different views to this. Some say that microwave ovens retain nutrients and are deemed a more healthy way of cooking. That discretion is entirely upto you.

Once the oven type was decided, it was time to move on to the more minute details. The parameters to consider here are as follows:

i. The size of the oven
ii. Rotisserie option
iii. Chamber Lighting
iv. Wattage
v. Convection Fan

Size of the OTG:

Most websites tell you to choose the size of the OTG as per the number of family members. What most websites fail to tell you is that, if you are having your friends over for a get together, your small sized oven will not help. This is because smaller capacity OTGs have very less space inside, which makes it difficult even for standard sized utensils to be used in them. Therefore, I would suggest that you go for an oven somewhere in between 28-32 litres, irrespective of your small family size. Of course, if you have a fuller family, then you can go for a larger sized oven. In my case, I got a 35 litre capacity oven.

Rotisserie option

A motorized rotisserie is a must, if at all you are planning to use one. This ensures even cooking of the kebabs being handled. Of course, a lot of people/ blogs are going to tell you that the rotisserie option is not required for vegetarian/ vegan people. But these days, there are a lot of food options cropping up. There are paneer kebabs, mushroom seekh kebab, fruit kebabs and so on. Therefore, if you are a foodie, I suggest that you definitely go for it. Just one thing to bear in mind is the type of rod that you are getting with the oven. Following are the basic 2 types:
Type 1

Type 2

I got a type 1 kind of attachment with my rotisserie rod, which is suitable for big chunks of meat like whole chicken, lamb rack etc. But I wish I had got the type 2 kind, which would be more suitable for vegetables/ paneer etc. Of course, there is a way around for everything, so I'm not too worried :). Therefore, please check the type of rotisserie rod attachment that you get with your oven.


Chamber Lighting:

It allows you to take a sneak peek inside the oven while there is something still cooking. This can be very useful when you are baking cookies, cupcakes, muffins or practically anything. It lets you see the changing colour of the food and gives you an idea of any setting changes which you might have to make.
e.g. - While baking a cake it should start turning brown atleast 12-15 minutes later. But if you see, that the cake has started browning before that, then you should turn down the heat, to let the insides cook properly without the outside of the cake burning.

Wattage:

This is a very simple feature. Higher the wattage, quicker it cooks. Not much to say here.

Convection Fan:

It is said that a convection fan circulates the heat inside the oven chamber, thus ensuring a uniformly cooked food. Also, it prevents localized heating in the oven chamber and cooks faster.

Budget:


Last but not the least, what we want to keep in mind is the budget that you wish to work with. The oven that I bought, considers all the above points and it cost me around 9k INR. However, that is a slightly higher end model. I have seen equally credible results with lower end OTGs as well.

In my next post - I am going to tell you about the OTG that I bought and the experience that came with it.

Till then, Happy Baking!